
CLI
The Static Studio CLI lets you manage your sites from your terminal instead of clicking through the dashboard - and, just as importantly, it lets an AI assistant like Claude Code, Codex, or Cursor manage them for you.
It's a small, predictable command-line tool that covers the everyday Studio tasks: creating sites, pushing changes, setting up domains and redirects, running backups, inviting users, checking performance, and reading logs. Because every command is simple and scriptable, it's a natural fit for handing repetitive work off to an AI agent.
This article walks through installing it, signing in, using it with AI, and the everyday commands you'll reach for most.
Before you start
You'll need:
- Node.js 20 or newer installed on your computer.
- A Static Studio account (the same one you use for the dashboard).
Install
Install the CLI globally with npm:
npm install -g @simply-static/static-studio
Then check it's working:
static-studio --help
You can type either static-studio or the shorter sss - they're the same tool. We'll use the full name throughout this article.
Sign in
Most people sign in with their email. The CLI sends you a one-time code and stores the session securely on your computer:
static-studio login --email you@example.com
Once you're signed in, you can confirm who you are at any time:
static-studio whoami
Your session is saved to ~/.static-studio/config.json on your own machine, so you only sign in once. To sign out:
static-studio logout
Signing in for AI agents and automation
If you want an AI assistant or an automated script to use the CLI, signing in with your email isn't ideal - there's no inbox to check for a one-time code. Instead, you can create a Personal Access Token: one permanent token you can hand to a coding agent, a CI pipeline, or anything else that runs unattended.
Create your access token
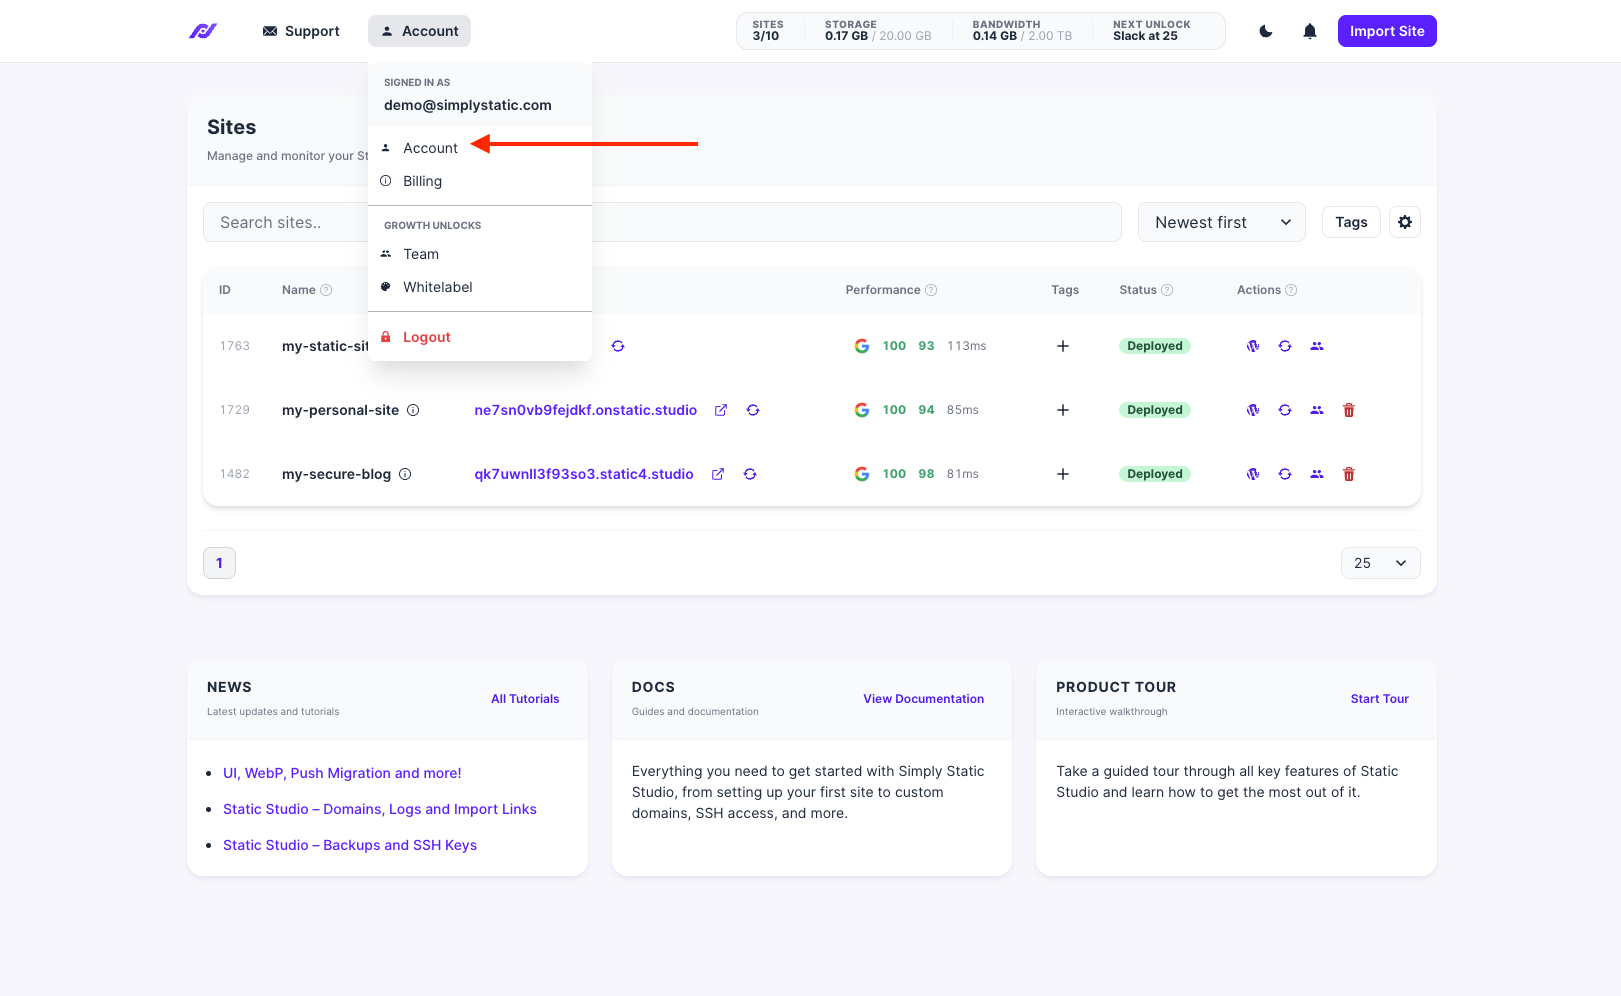
Open the Account menu in the top bar of your dashboard and choose Account:
Then switch to the Access Token tab. Click Copy to grab your token, then store it somewhere safe:
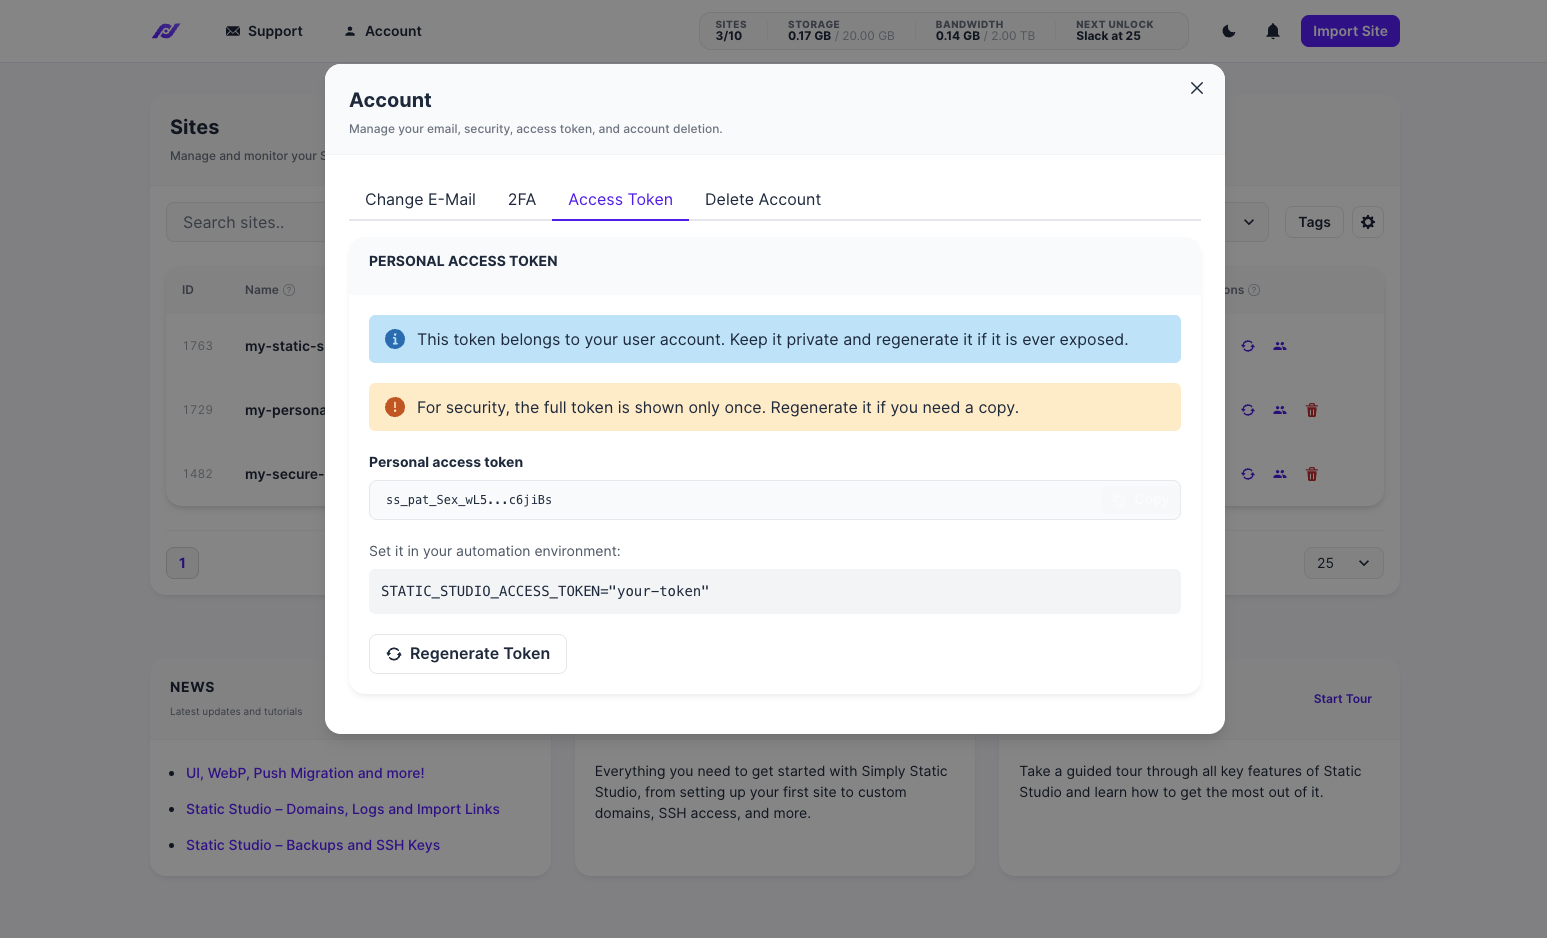
A couple of important things to know:
- The full token is shown only once. If you lose it or need a fresh copy, click Regenerate Token - this creates a new token and immediately invalidates the old one.
- Keep it private. The token acts on behalf of your account, so treat it like a password and regenerate it right away if it's ever exposed.
- Personal Access Tokens require an active paid subscription. On a trial you'll see the option in the app, but you won't be able to issue a token yet.
Use your token
The recommended approach is to put your token in an environment variable called STATIC_STUDIO_ACCESS_TOKEN , then sign in with it once:
static-studio login --token "$STATIC_STUDIO_ACCESS_TOKEN"
Alternatively, you can skip the saved login entirely and provide the token inline with any command — handy for one-off scripts or CI steps:
STATIC_STUDIO_ACCESS_TOKEN=your-token static-studio --json sites list
This is the recommended setup for coding agents, CI pipelines, and anything running unattended.
Using the CLI with AI
This is where the CLI really shines. It was built so that AI coding assistants - Claude Code, Codex, Cursor, and similar tools - can manage your Static Studio sites by running commands on your behalf. Instead of describing what you want and then doing it yourself, you can simply ask your assistant and let it do the work.
Why does it work well with AI
- Every command does one clear thing. There's no guesswork, so an assistant can reliably chain commands together.
- It speaks JSON. Add
--jsonto any command and the output becomes clean, machine-readable data that an assistant can read and act on:
static-studio --json sites list
- It's safe by default. Commands that delete or disable something always ask for confirmation first (more on that below), so an assistant won't accidentally remove a site without a clear instruction.
Getting set up
- Install the CLI globally (see above) so your assistant can find it.
- Create a Personal Access Token and set it as
STATIC_STUDIO_ACCESS_TOKENso your assistant can authenticate (see Signing in for AI agents and automation above). - Tell your assistant the tool is available - for example: "You can manage my Static Studio sites using the
static-studioCLI. Use--jsonso you can read the results."
Things you can ask your assistant to do
Once it's set up, you can give your assistant plain-English instructions like:
- "List all my Static Studio sites and tell me which ones have pending changes."
- "Create a new site called 'Client Demo' and push the full site."
- "Add the domain example.com to my site and make it the primary domain."
- "Pull the last 200 error log lines for my site so we can debug this."
- "Run a performance test on my site and summarize the results."
- "Set up these 50 redirects from the spreadsheet I gave you."
Your assistant translates each request into the right CLI commands, runs them, reads the results, and reports back. You stay in control, and the assistant handles the busywork.
A note on safety: Destructive actions (like deleting a site) normally pause and ask for confirmation. An assistant can only skip that prompt if it adds the
--yesflag, so it's worth being explicit in your instructions about what you do and don't want removed.
Everyday commands
You don't need to memorize these - your AI assistant can look them up - but here are the tasks you'll reach for most. Throughout, <siteId> means the ID of the site you're working with, which you can find with sites list .
See your sites
static-studio sites list static-studio sites list --search demo static-studio sites get <siteId>
sites list shows each site's ID, name, URL, status, and creation date. Use --search to filter by name or URL.
Create a site
Create a quick site with a generated name and address:
static-studio sites create --name "Demo"
Or specify the details yourself:
static-studio sites create --name "Demo" --subdomain demo123 --php-version 8.3
You can also create a site from a migration archive (for example, a backup exported from another site):
static-studio sites create --name "Imported Site" --migration-file ./studio-backup-imported-site.zip
A few things to know about migration files: accepted formats are .zip , .tar.gz , and .tgz , the maximum size is 10 GB, and ZIP filenames should include studio-backup- in the name.
When a site is created, the CLI shows you the new site's details along with the generated WordPress and Basic Auth login credentials.
Push your site
Pushing publishes your WordPress content to your static site. You can push everything, or just what's changed:
static-studio sites push <siteId> full static-studio sites push <siteId> changes
Use full to re-export the entire site, or changes to push only recent updates. You can also clear the CDN cache or check how many changes are pending:
static-studio sites changes <siteId> static-studio sites clear-cache <siteId>
Quick site access
Get a temporary one-click login link to the WordPress admin, or view the site's Basic Auth credentials:
static-studio sites magic-login <siteId> static-studio sites basic-auth <siteId>
Custom domains
static-studio domains list <siteId> static-studio domains add <siteId> example.com static-studio domains primary <siteId> example.com static-studio domains issue-ssl example.com static-studio domains remove <siteId> old.example.com
Adding a domain or changing the primary domain automatically starts a fresh export so your site is served on the new address.
Redirects
Create a single redirect from an old path to a new one:
static-studio redirects create <siteId> /old-page /new-page
List, edit, or toggle existing redirects:
static-studio redirects list <siteId> static-studio redirects update <siteId> <redirectId> --from-path /old-page --to-path /new-page static-studio redirects disable <siteId> <redirectId> static-studio redirects enable <siteId> <redirectId>
Have a lot of redirects? Add them all at once from a JSON file:
static-studio redirects bulk-create <siteId> redirects.json
The file is a simple list of fromPath and toPath pairs (up to 1,000 of them):
[ { "fromPath": "/old-page", "toPath": "/new-page" }, { "fromPath": "/docs", "toPath": "https://example.com/docs" } ]
This is a great task to hand to an AI assistant - give it your old and new URLs in any format and ask it to build the file and run the import.
Backups
static-studio backups list <siteId> --refresh static-studio backups create <siteId> static-studio backups restore <siteId> --backup-id <backupId>
You can restore (or delete) a backup either by its ID or by date with --date 2026-06-14 .
Users and team members
Invite someone to a specific site, or add an existing Studio user:
static-studio users list <siteId> static-studio users invite <siteId> person@example.com --role administrator static-studio users add <siteId> existing@example.com --role editor static-studio users remove <siteId> person@example.com
Roles can be administrator , editor , author , contributor , or subscriber .
To manage your wider account team - for example, giving a teammate access across your sites:
static-studio team list static-studio team invite person@example.com teammate@example.com --role editor --invite-missing static-studio team bulk-invite emails.txt --role editor --invite-missing
--invite-missing also sends invitations to people who don't yet have a Static Studio account.
Performance
Run a PageSpeed and global response-time test, or pull CDN statistics:
static-studio performance run <siteId> static-studio performance stats <siteId> static-studio performance get <siteId> static-studio performance reports <siteId> --limit 20
performance get runs the test and fetches CDN stats together — handy for asking an assistant to test a site and summarize the results in one go.
Logs and debugging
Pull your site's WordPress debug log straight into your terminal:
static-studio logs get <siteId> --tail 200 --level error static-studio logs get <siteId> --search "fatal error" --newest-first static-studio logs get <siteId> --tail 1000 --output-file ./debug.log
Filter by level (error , warning , notice , info ), search for specific text, show the newest lines first, or save everything to a file. This pairs especially well with AI — ask your assistant to pull the recent errors and explain what's going wrong.
Staging environments
If you use environments, you can manage staging and other child environments:
static-studio environments list <siteId> static-studio environments enable <siteId> static-studio environments create <siteId> staging static-studio environments delete <siteId> staging --yes
Tags
Organize your sites with colored tags - useful for grouping client work:
static-studio tags list static-studio tags create Client --color '#3858E9' static-studio tags assign <siteId> <tagId> static-studio tags site <siteId>
SSH / SFTP keys
static-studio ssh list static-studio ssh add <siteId> --key-file ~/.ssh/id_ed25519.pub static-studio ssh connect <siteId> <keyId>
Managing multiple accounts
If you manage sites for more than one account - for example, an agency handling several clients - you can keep separate logins using profiles. Add --profile <name> to any command:
static-studio --profile client-a login --email admin@client-a.com static-studio --profile client-b login --email admin@client-b.com static-studio --profile client-a sites list
Each profile keeps its own saved session, so you can switch between accounts without signing in and out.
Safety and confirmations
A handful of commands can't be undone, so the CLI always asks you to confirm before running them. These include:
sites deleteenvironments deleteandenvironments disabletags deleteteam remove
If you (or an automation) need to skip the prompt - for example, in a script - add the --yes flag. If you cancel a prompt, nothing happens, and the command exits cleanly.
Quick reference
| What you want to do | Command |
|---|---|
| Sign in | static-studio login --email you@example.com |
| List your sites | static-studio sites list |
| Create a site | static-studio sites create --name "Demo" |
| Push the whole site | static-studio sites push <siteId> full |
| Push only changes | static-studio sites push <siteId> changes |
| Add a domain | static-studio domains add <siteId> example.com |
| Create a redirect | static-studio redirects create <siteId> /old /new |
| Create a backup | static-studio backups create <siteId> |
| Invite a user | static-studio users invite <siteId> person@example.com |
| Check performance | static-studio performance get <siteId> |
| Read error logs | static-studio logs get <siteId> --tail 200 --level error |
| Get machine-readable output | add --json to any command |